sixpax wrote:
Salam kenal Bro, Thank bro atas masukannya,

, gw juga tertarik kalo soal jetting2an, gw sering baca di beberapa rubrik mengenai jeting pada karbu pulsar, masalahnya gw gak ngerti kalo pake Karbu Vakum, gw sebelumnya punya motor dengan karbu non vakum, yang gw tau jetingan umum hanya dai MJ dan PJ, dengan knalpot standar PJ cukup naikan 2 step dan MJ sesuai kebutuhan aja.
Kalo di Pulsar boleh gak bro hank ajarin gw secara umum karakter karbu vakum seperti apa, dan rekomendasiin donk untuk no.1 s/d 7 cara setting Jetingannya gimana?

oh iy satu lagi, kalo pake busi Splitfire gimana bro, cocok gak di PZ00
Thx a lot sebelumnya..
salam kenal jg bro...

karbu vakum dan non vakum pada dasarnya sama aja. Prinsip jettingnya tetep sama...
karakter karbu vakum, bensin yg ngecrot ya sesuai ama hisapan mesin. Sekalipun kita gas pollll mentok,, ama diurut pelan2,,, ya sami mawon...
Klo karbu skep biasa kan gak gitu, kecrotan bensin tergantung ama tangan kita,,hehe...
ini cara jetting dari Factory Pro, berguna bgt buat yg baru ganti karbu:
Follow steps in order....First, dial in:
* 1. Top end (full throttle / 7.5k to redline -
Best Main Jet must be selected before starting step 2 (needle height)!
+ Select Best Main Jet
o To get the best, most even top end power (full throttle/after 7500 rpm), select the main jet that produces the hardest pull at high rpm.
+ If the bike pulls harder at high rpm when cold and less hard when fully warmed up, the main jet is too large. Install a smaller main jet and retest until you find the main jet that pulls the hardest at high rpm when fully warmed up. This must be done first - before moving on to the other tuning ranges.
+ If the bike doesn't pull well at high rpm when cold and gets only slightly better when fully warmed up, the main jet is too small.
# In order to properly tune the midrange and low rpm carburetion, THE MAIN JET MUST FIRST BE PROPERLY SELECTED after 10 to 15 minutes of hard use!
* Do not pay too much attention to the low-end richness when you are changing main jets - you still need to be using the main jets that produce the best power at high rpm. You will deal with the low-end / cruise later - after step 2.
* 2. Midrange (full throttle /5k-7k)
Step 1 (Best Main Jet) must be selected before starting step 2!
+ Select best needle clip position
o To get the best power at full throttle / 5k-7k rpm, adjust the needle height, after you have already selected the best main jet.
+ If the engine pulls better or is smoother at full throttle/5k-7k in a full throttle roll-on starting at <3k when cool but soft and/or rough when at full operating temperature, it is too rich in the midrange and the needle should be lowered.
+ If the engine pulls better when fully warmed up but still not great between 5k-7k, try raising the needle to richen 5k-7k.
+ If the engine pulls equally well between 5k-7k when cooler as compared to fully warmed up, the needle height is probably properly set.
# Do not pay too much attention to the low-end richness when you are changing needle clip positions - you still need to be using the clip position that produces the best full throttle / 5k-7k power in conjunction with the main jets (Step 1) that produce the best power at high rpm. You will deal with the low-end / cruise next.
* 3. Low end (full throttle / 2k-3k)
Step 1 (Best Main Jet) and Step 2 (needle height) must be selected before starting step 3!
+ Float height (AKA fuel level & how to..)
o To get best low-end power, set float height (fuel level) so that the engine will accept full throttle, without missing or stumbling, in 2nd gear from 2.5k to 3k rpm at minimum.
+ Float heights, unless otherwise specified in the installation guide, are measured from the "gasket surface" of the carb body to the highest part of the top of the float - with the float tang touching but not compressing the float valve spring.
+ If the engine has a "wet" rhythmic, soggy area at full throttle / 3k-4k rpm, that gets worse as the engine heats up, lower the fuel level by resetting the float height 1mm greater (if the original was 13mm - go to 14mm). This will lower the fuel level, making full throttle / 2k-3k rpm leaner.
+ If the engine is "dry" and flat between 2k to 3k rpm, raise the fuel level.
+ Example: change float height from 15mm to 14mm to richen up that area.
+ REMEMBER, since the main jet WILL affect low speed operation, the MAIN JET has to be within 1 or 2 sizes of correct before final float setting.
# Warning: If the engine is left with the fuel level too high,, the engine may foul plugs on the street and will be "soft" and boggy at part throttle operation. Adjust Floats to raise/ lower the Fuel Level.
* Base settings are usually given if a particular application has a history of fuel level criticalness. The Fuel level height in the float bowl affects full throttle/low rpm and, also, richness or leanness at cruise/low rpm.
# Reference: a bike that runs cleanly at small throttle openings when cold, but starts to show signs of richness as it heats up to full operating temperature, will usually be leaned out enough to be correct if the fuel level is LOWERED 1mm. Check out and RESET all: Suzuki (all), Yamaha (all) and Kawasaki (if low speed problems occur). Needless to say, FUEL LEVEL IS EXTREMELY IMPORTANT!!!
+ If there are low-end richness problems, even after lowering the fuel level much more than 1.5mm from our initial settings, check for needle wear and needle jet (part of the emulsion tube). See Worn Needle and Worn Needle Jet diagram. It is VERY common for the brass needle jets (in the top of the "emulsion tube") in 36mm, 38mm and 40mm Mikuni CV carbs to wear out in as little as 5,000 miles. Check them for "oblong" wear - the needle jet orifice starts out round! Factory Pro produces stock replacement needle jets / emulsion tubes for 36mm and 38mm Mikuni carbs. Click here
* 4. Idle and low rpm cruise
+ Fuel Screw setting (AKA mixture screws)
# There is usually a machined brass or aluminum cap over the fuel screws on all but newer Honda. It's about the diameter of a pencil. Cap removal details. Newer Honda carbs have no caps, but use a special "D" shaped driver, usually supplied in the carb recal kit. We do have them available separately, too. 800 869-0497 to order -
+ Set for smoothest idle and 2nd gear, 4k rpm, steady state cruise operation. Set mixture screws at recommended settings, as a starting point. For smoothest idle, 2nd gear 4000 rpm steady state cruise , and 1/8 throttle high rpm operation. (pj tuning information)
+ Pilot fuel mixture screw settings, float level (but, you've "fixed" the fuel level in Step 3 - which you have already done!) AND pilot jet size are the primary sources of mixture delivery during 4000 rpm steady state cruise operation.
# If lean surging is encountered, richen mixture screws (turn out) in 1/2 turn increments. Alternative pilot jets are supplied when normally required.
# Pilot fuel mixture screw settings, float level and pilot jet size also affect high-rpm, 0 to 1/8 throttle maneuvers. Too lean, will cause surging problems when the engine is operated at high rpm at small throttle openings! Opening the mixture screws and/or increasing pilot jet size will usually cure the problem.
* NOTE: A rich problem gets worse as the engine heats up.
o If the throttle is lightly "blipped" at idle, and the rpm drops below the set idle speed, then rises up to the set idle speed, the low speed mixture screws are probably set too rich: try 1/2 turn in, to lean the idle mixture.
* NOTE: A lean problem gets better as the engine heats up.
o If the throttle is lightly "blipped" at idle, and the rpm "hangs up" before dropping to the set idle speed, and there are no intake leaks and the idle speed is set at less than 1000 rpm, the mixture screws are probably too lean: try 1/2 turn out, to richen mixture. Be sure there are no intake leaks and the idle speed is set at less than 1000 rpm!
* Carb Kit Design is a combination of science, art, intuition and and at times, a fair dose of wizardry. There is no dyno that "tells" one how to assemble or modify the carb to deliver proper power and response.
* Perfect Carb Kit TUNING requires patience and perseverance and "reasonable" feel to feel the changes - of which - most motorcycle riders have a good ability to do.
When a dyno "operator" says he/she has to ride the bike after dyno tuning to do the final tune for cruise smoothness - that's what they are doing. Avoid any dyno operator who says that they don't have to do that!!!
The only dyno that I know of that will duplicate and visually display the engine smoothness is the EC997 dyno (yes, I know, we make it) - that's one reason why, if you can, you'd like to use one for tuning - a smoother engine IS getting the best mixture. Other dynos claim to "tune to an "A/F Ratio" - probably the biggest marketing scheme in the dyno industry at this time - and they never can equal the quality of tune as designed -
These tuning kits have been thoroughly tested to ensure easy, trouble-free, optimized performance.
yg gak ganti2 karbu cukup liat warna busi....
dari om thompels @ kaskus
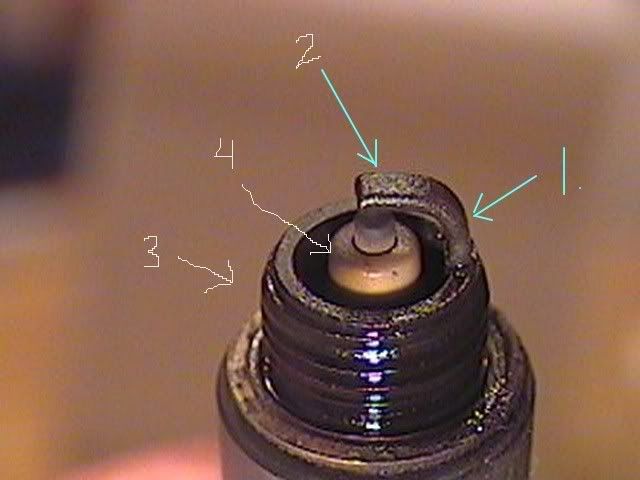
ts analyze this plug, sorry the numbered points aren't clear but it's 1-4 you can figure it out.
#1 Is a timing indicator, you'll see a definite color change on the ground strap, it doesn't show well here but you can still see it right about at the arrow. Too much timing and the color change will be very close to the threaded body of the plug, too little and it'll be closer to the tip. Ideally we want it right in the apex or center of the 90 bend on the ground strap. This plug shows too much timing for the combustion chamber efficiency or octane level.
#4 Arrow shows another indicator of timing, you'll usually see a brown ring right at the tip of the porcelain area it should be a sharp and defined ring about .020 wide. Wider indicates not enough timing and any smaller , or only 1/2 way around or nonexistent as in this image is the second indication of too much timing in the motor.
#2 The tip of the ground strap is loaded with OIL deposits, fuel deposits are usually flat black in color and almost like a fine powdery deposit, this motor is leaking oil into the combustion chamber, bad valve guides, leaking valve covers allowing oil to seep through the plug threads, whatever it needs to be fixed.
#3 The threaded portion of the plug gives you the heat range, look at the threads you'll see that a few toward the tip are a dull burnt looking color the rest are black and shiny. You want about 2 threads showing the heat on the end of the plug and the rest of the threads to be shiny, this plug is impossible to read because of the oil mess. If you using a longer reach plug than this one 2.5 to 3 threads is optimum.
To increase the number of burnt threads increase the heat range of the plug, if you have 4-5-6 threads burnt you need to get a colder plug.
Looking at the color of the porcelain I'd give this carb a passing grade at the mid range and not to bad on the idle circuits although that dam oil leak makes it tough to really get a good read. I'll get some better shots for lesson 2.
I'm going to keep working on this page and try and get some real good shots of various plugs, we'll study each one and find the good and bad tell tales of each.
I'll also start pulling some plugs out of my race car at various settings and get pictures so we can see how jetting, timing and heat range affect the plugs in the same engine under the same conditions.[/code]
Code: Select all
[img]http://i224.photobucket.com/albums/dd260/thompels/Plug-2.jpg[/img]
The plug is showing me by the deposits on the tip of the electrode and also the deposits right on the edge of the threaded body.
that it's slightly fat at idle.

The white porcelain is showing a lean condition at WOT, it's not too far advanced as the total timing mark or color change is right in the apex of the ground strap curve. The Idle timing is shown by the triangular hazing up on the flat of the ground strap and without even looking at the distributor specs I can tell you that the timing on this SB Mopar is about 18-20 initial and 34 total.

I would need a better picture of the threads to determine the heat range.

Changes:
I would try and lean it out just a touch at idle and up the jets by 2 points to fatten up the WOT circuit.

That slightly lighter color at the tip of the ground strap indicates too much gap, nothing serious but next time you change plugs I'd go to about a .036 gap from the current .040. Too much resistance caused by too wide of a plug gap can cause excessive heat on the tip which will shorten the life of the plug and really give you no benefits. I believe excessive plug gaps are not required on most Muscle and bracket cars, once you get into real big compression and major power you would open up the gap and replace plugs 2-3-4 times a year.[/quote]